
A step by step guide to setting up Amazon Cloud Search (With examples)

If you browse through a wide variety of websites, one thing you will find in common just about everywhere is the search option. If you are a music lover browsing through your favorite tracks, a food blogger checking out new food trends from the modern city you are visiting, looking for your favorite artist playing their next gig or just doing window shopping on your favorite shopping app, searching is the essential part of any significant data-driven website. Without search or even a suitable searching mechanism your data is virtually inaccessible from the reach of your users.
So, to put it in simple words, your search engine’s implementation is one of the essential parts of your web application. This drives users to the content they are looking for in the fastest and efficient way. This also brings up the discussion about selecting the right search tool for your application. There are multiple searches as service provider tools available to choose from.
- Google Cloud Search
- Azure Cognitive Search
- SharePoint Online / Office 365 Search
- Amazon CloudSearch
- Amazon ElasticSearch
Amazon
Elasticsearch and CloudSearch are Amazon’s cloud-based solutions for search. Elasticsearch is an open source solution, whereas CloudSearch is a fully managed search service. It is quite simple to set up, easy to, and a cost-effective search solution. Amazon CloudSearch is an AWS Cloud managed service that helps users to create fast, scalable, profitable, easy to setup search solutions for their applications. Amazon CloudSearch uses Apache Solr as the underlying text search engine, which supports full-text search, faceted search, real-time indexing, dynamic clustering, database integration, NoSQL features, and productive document handling.
You will be able to interact with Amazon CloudSearch through three service layers mentioned below:
- Document service
- Configuration Service
- Search service
Your Identity and Access Management (IAM) policies will allow you to access, manage, and configure your Amazon CloudSearch services. The Configuration service and Document service are for developers to set up and maintain the CloudSearch domain and its data. Whereas Search service is client facing where developers and QA can verify the configuration, indexes, and validate the data. Also, this is exposed to the real world users where it’ll cater all the search requests coming from either a web application or from a mobile app where the search domain is configured. Search service is also responsible for delivering fast, accurate, and real-time data for all the user queries.
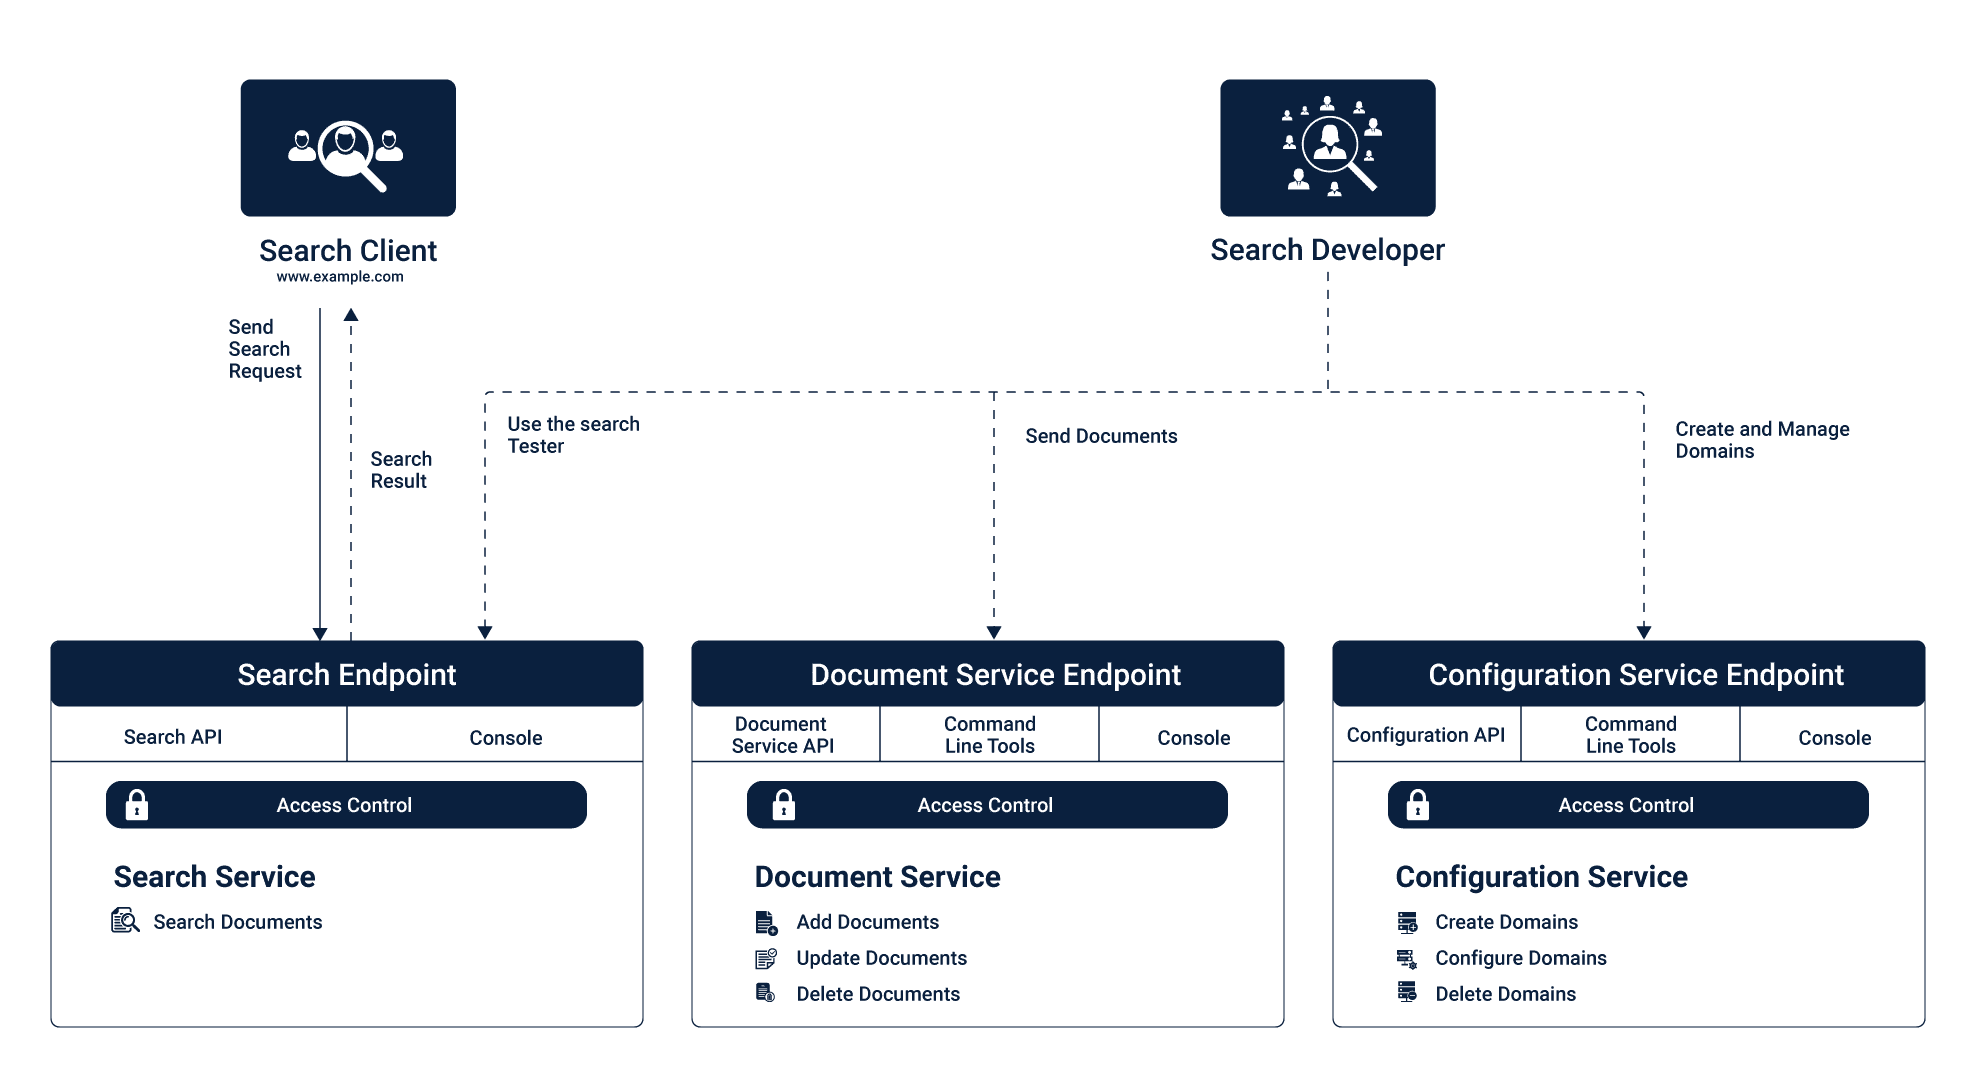
Document service
Document service is used to manage and configure searchable data of the domain. Each domain will have its endpoint. To upload your data, you need to format it into XML or JSON. Each item that you want to be returnable as a search response is called a document. Every object in your search response will have that unique document id and search fields that you requested in your search request. Document service also allows you to add new data anytime you want. Once the information is uploaded, it’ll reindex automatically and will be available to search in just minutes.
Configuration Service
Configuration Service allows you to create and manage the search domain. This helps you to index, scale deploy it to multiple availability zones. This has quite a helpful step by step wizard to guide you through all the configuration steps for your search domain. You have to start with a unique name for your search domain, then configure the search index, set your scaling options and availability zone with the instance size.
Search service
Once all this is set up, you’ll be able to test out your domain with unique HTTP endpoint and query parameters handled by Search service. Search service handles search and suggestion requests for the area. The search service will have a single HTTP endpoint for querying. You can configure your search results in either XML or JSON format. CloudeSeach supports rich query language that helps users to build search queries with related text search, range search, facet option to filter through options and other options to create composite questions.
Following are the main benefits Amazon CloudSearch provides that compelled me to use CloudSearch over other services:
Simple
If your tech stack is already hosted on AWS, then setting up CloudSearch is quite simple. You can set that up via AWS Management Console, AWS SDKs or AWS CLI. Adding data to your search is as simple as uploading a file(JSON, XML or text file) from AWS Management Console, browse your data and upload it. CloudSearch will automatically do the grunt work, identifies the file type, analyze the data, set up indexes, create a search, sort and facet options. The user has to review it and save changes.
Fully Managed
Amazon CloudSearch is a fully managed custom search service, where you will be able to pick your instance type, select availability zones, provisioning as well as scaling and partition using either AWS CLI or management console. Data uploading, reindexing, suggesting facet search options are all done from the quite intuitive and user-friendly management console, which helps to set up your domain and be ready for start testing it in minutes with simple wizard-based instructions.
Scalable
Scalability is one of the essential aspects when you are growing. The CloudSearch domain will autoscale as your data or query volumes increases. AWS CloudSearch will automatically scale up or down depending on your domain’s as per its usage. So if the load increases, it’ll scale up to meet the requirements and scale down when there aren’t any significant number of queries.
Reliable
Reliability is most important when you are working with data that drives your applications search service. AWS CloudSearch has Multi-AZ options, so your data is secure of any hardware failure and also minimize latency. Search traffic automatically distributes across all available zones to meet the requirements and auto-scales depending on the load. It will make sure if one free zone fails then it’ll request to next nearest data source and fetch the data.
High Performance
Performance is one of the most important criteria while choosing your search engine. Faster data delivery is one if the main reason many engineers migrate from having a self build searching mechanism from searching from DB to externally hosted search service like AWS CloudSearch. Automatic indexing, horizontal – vertical scaling, and distributed data give you all the edge for delivering your data with low latency and high performance.
Prepare your test data :
Now we’ll show you how to create your domain on Amazon CloudSearch and set that up with your personal data. As we discussed earlier, you can upload your data in json, XML or text CSV file for your search domain. If you have your data, then you can upload that, or you can download a wide range of pre-formatted data from kaggle datasets. For this document purpose, I have chosen Google Play Store Apps data set. This data set has around 10.8K records; for this example purpose I have truncated it down to about 5K lines. You could do that with the following command.
head -100 oldfile > newfile
The truncated sample file is uploaded to https://github.com/akashs-cuelogic/CloudSearch. Feel free to use that.
Prerequisite:
AWS account !!
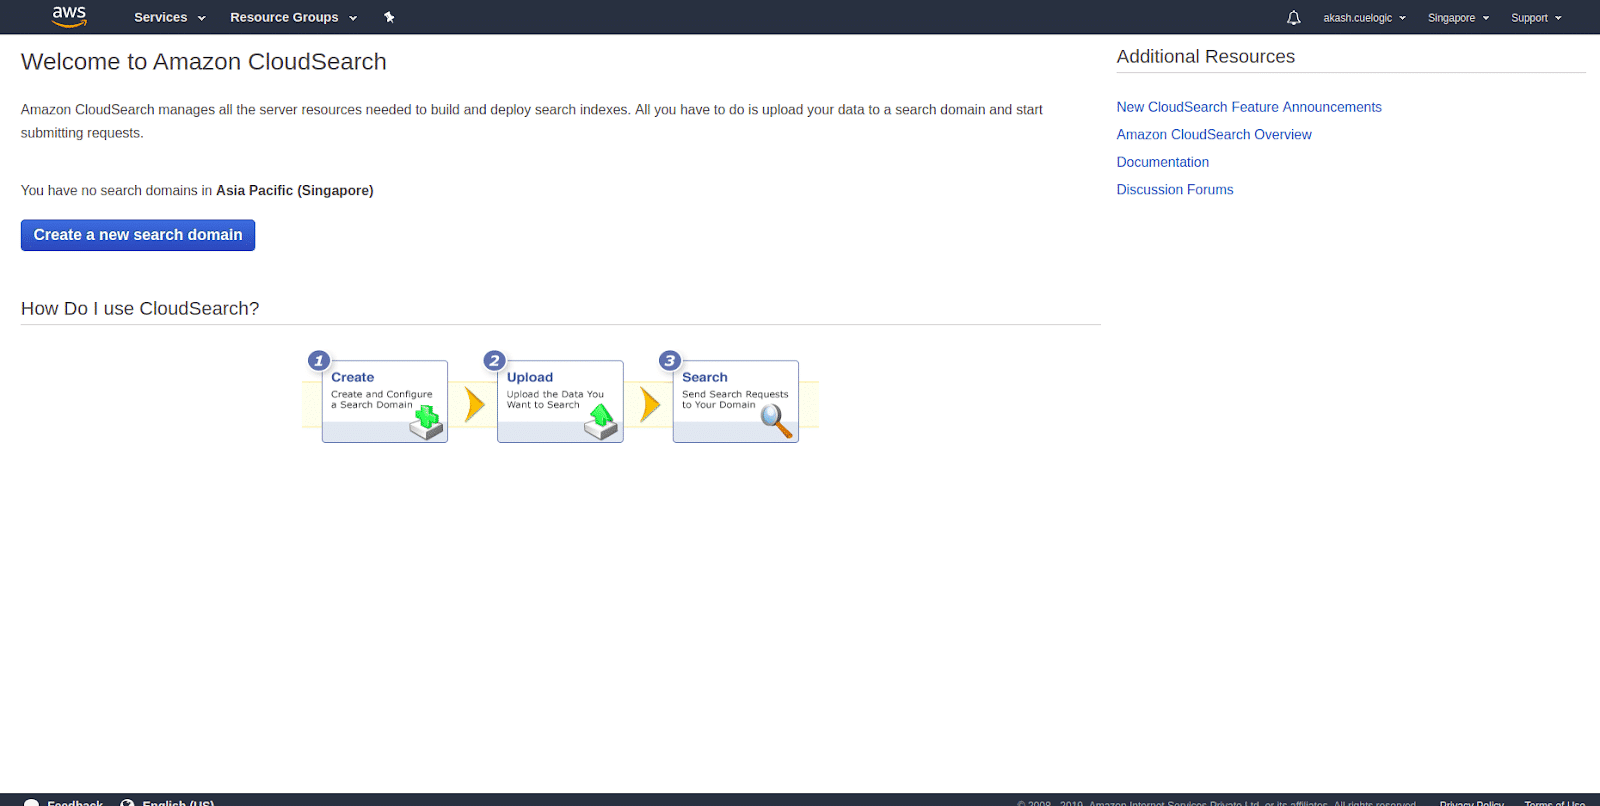
- Collect data From the AWS home page, navigate to Cloud Search under the Analytics section. This will give you a step by step instructions on how to create your own Cloud Search domain, upload data, set indexes, and start searching. Start by clicking the Create a new search domain shown in the picture below.

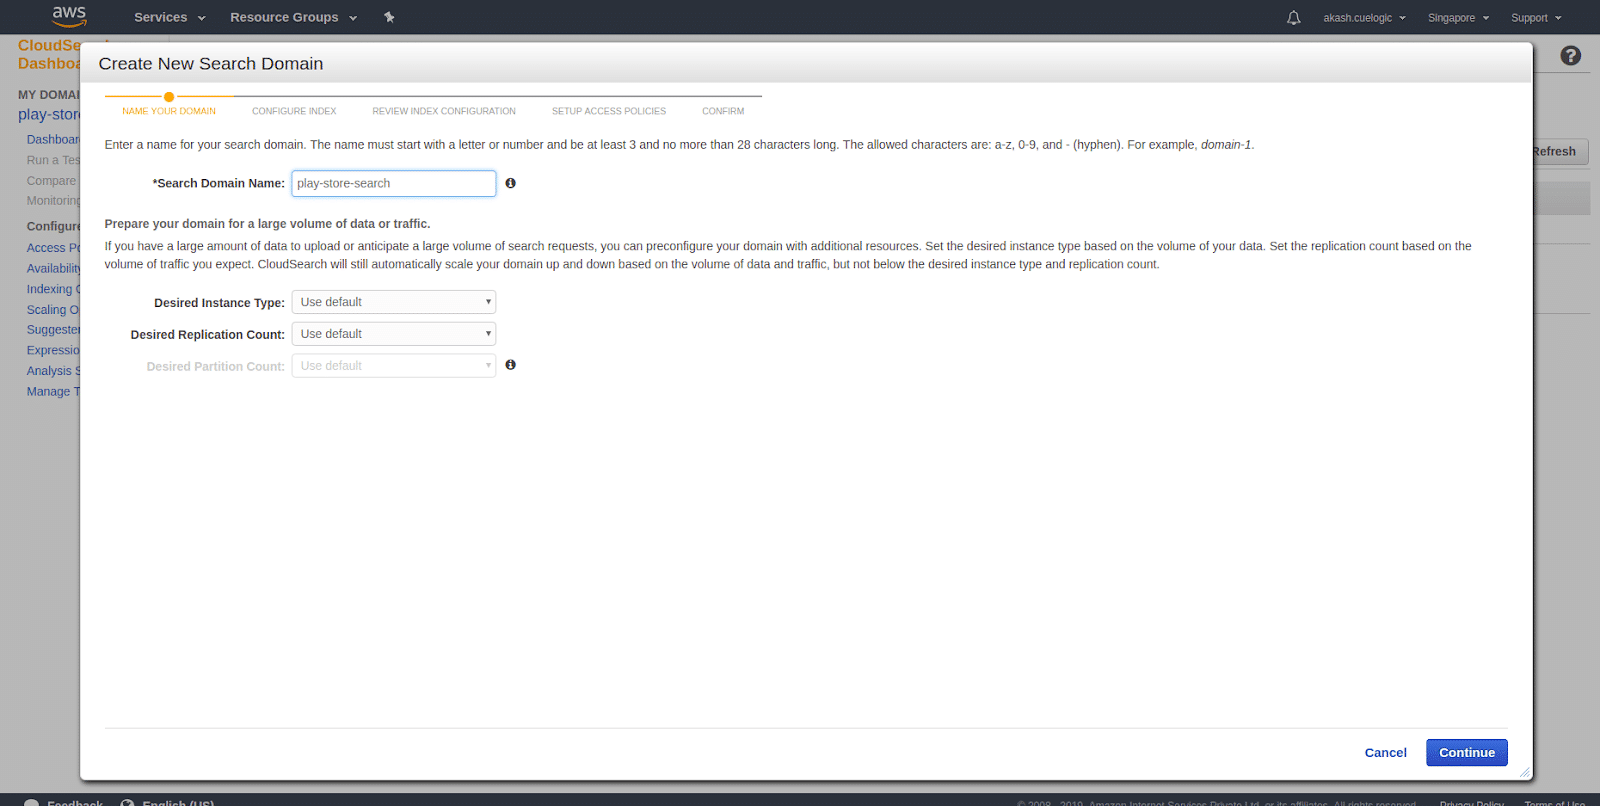
- Create a new search domain and setup size Setting up a name for you CloudSearch domain is relevant because that will also be a part of your search API’s url. Under that, you’ll see a couple of options to set up the size of your instance and replication count. The size of the case and replication count is directly proportional to the size of your data and the volume of your request. If you are working with an extensive set of data, it’s advisable to use a more significant instance type. And if you are expecting a large number of concurrent requests, then increase the replication count accordingly.
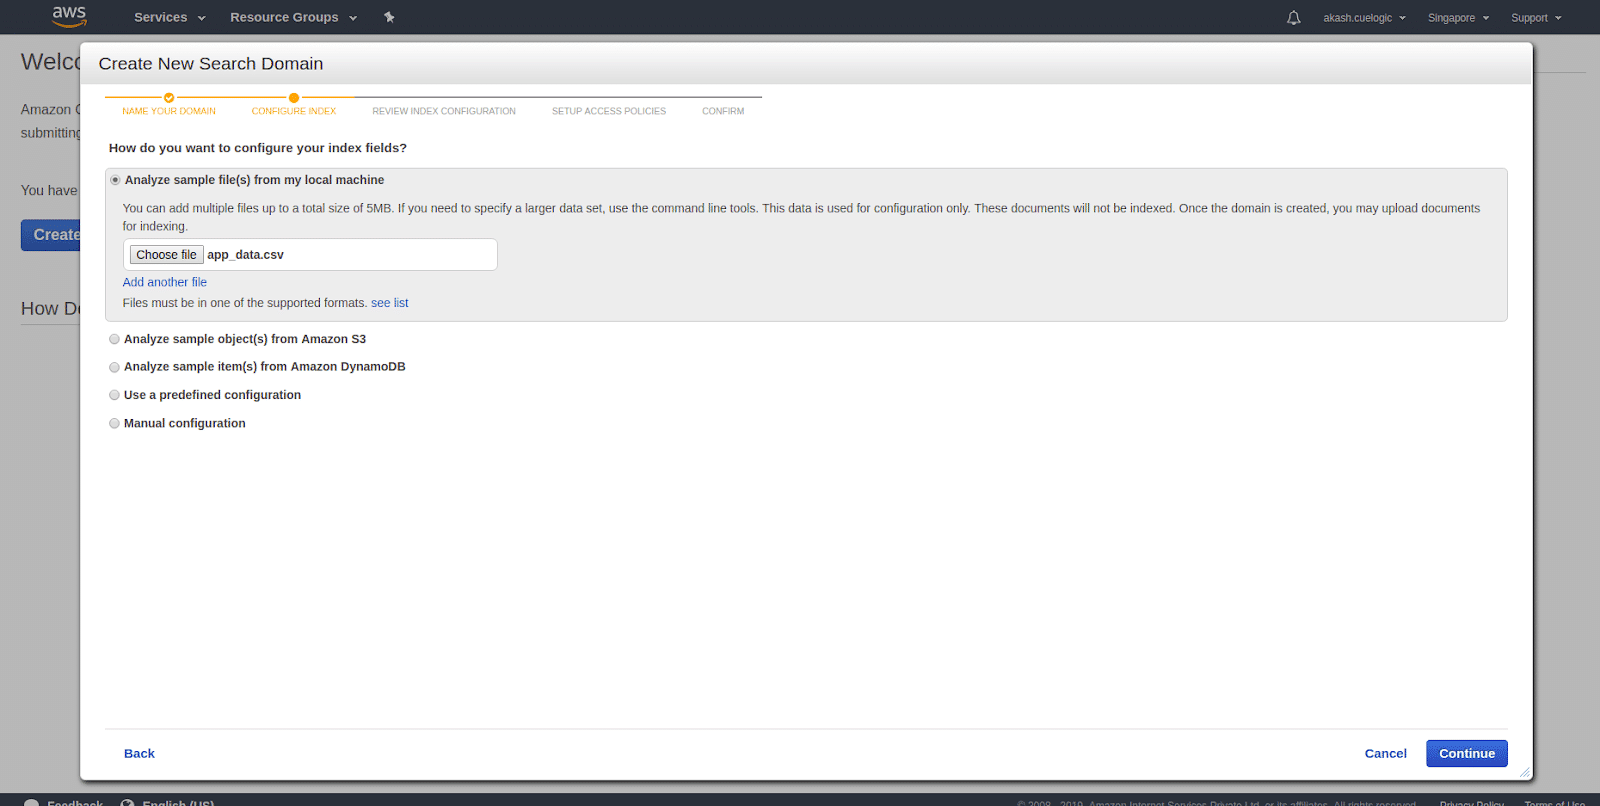
- Upload index definitions Indexing your data will dramatically increase the performance of your search and Cloud Search will do that automatically when you upload your data. For indexing, you don’t need your the whole set of data, and you need a few samples for Cloud Search to identify the data attributes and how to index them. There are multiple ways to upload sample data. You can upload it from your local machine, from your S3 bucket. You can also provide your DynamoDB data or do it manually. If you are trying things out, then, they also have sets of sample data to choose from and start testing things.
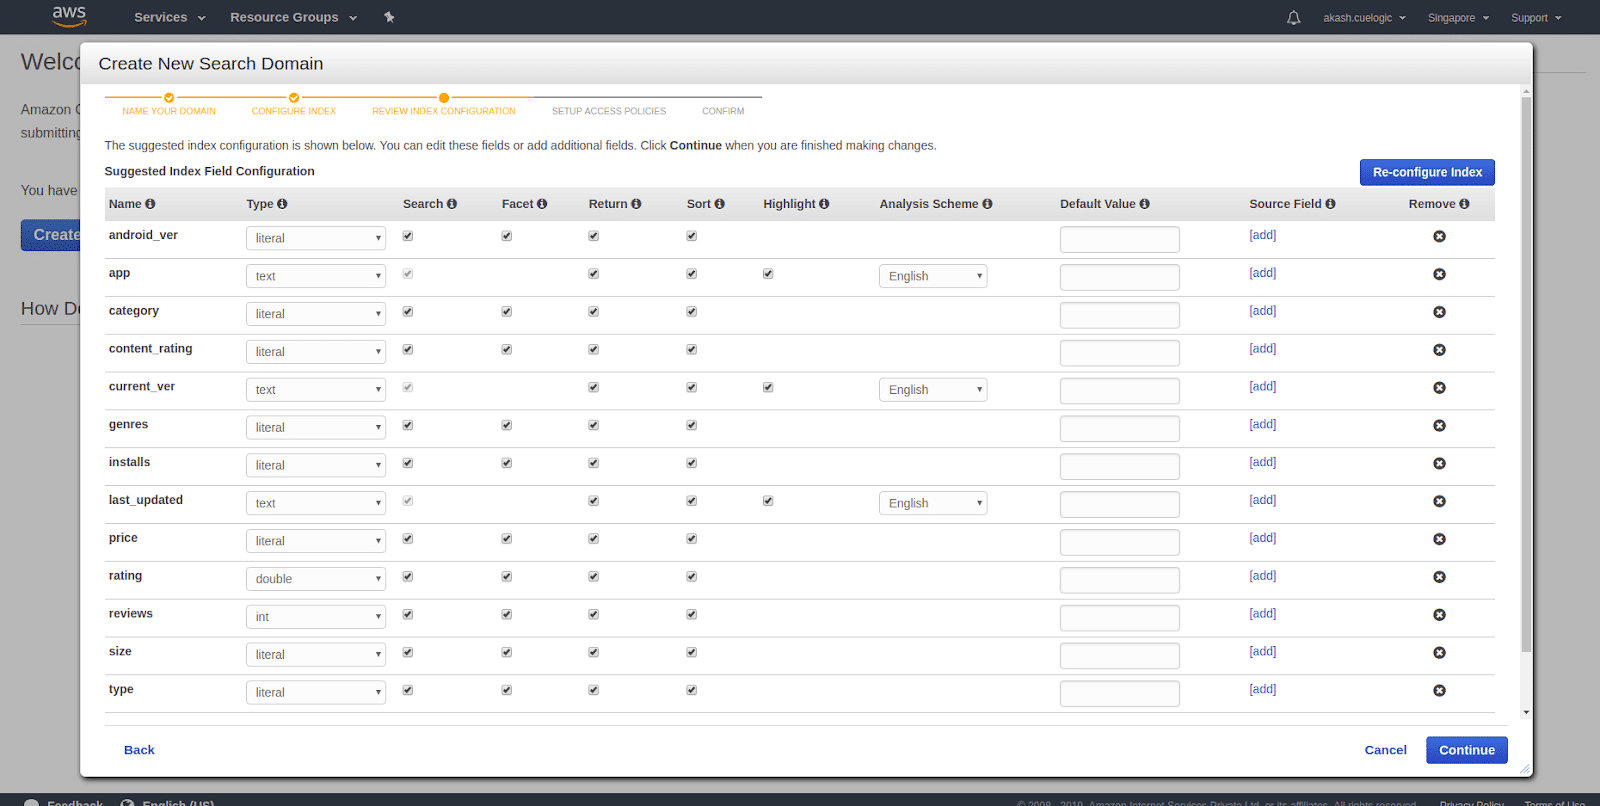
- Configuring indexes Index configuration is the essential thing while setting up your domain. In most cases, Amazon CloudSearch will automatically index your data and will be reflected in your results in a few minutes. Once any changes on your domain configuration need reindexing your data and you can run it manually also from either client or the dashboard.Indexing options control how your data is mapped to index fields and what information you can search and retrieve from the index. The data you upload must contain the same fields configured in your domain’s indexing options, and the field values must be compatible with the set field types.
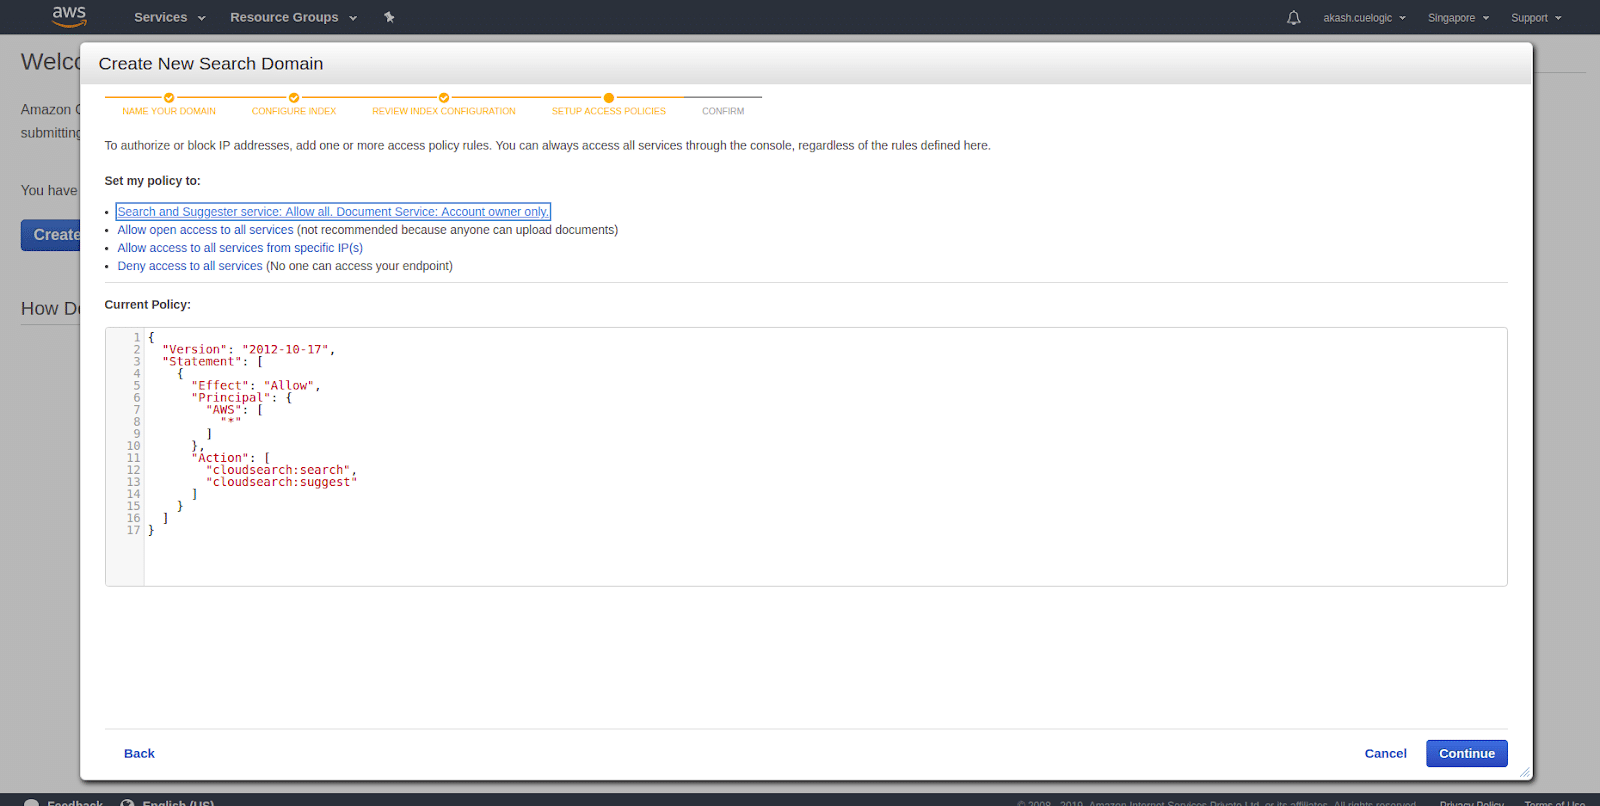
- Set up Access Policies Amazon CloudSearch providers you various way to allow and restrict service APIs(Search and Suggester) and the domain(Document) services APIs. There are multiple options you can toggle your accessibility to your services.
- Search and Suggester service: Allow all. Document Service: Account owner only.
This will allow search and suggester service accessible to everyone without any restrictions. And for who maintains domain and data there will be another service where they can upload new data, index them and make all the scaling and optimization they require for the CloudSearch to work efficiently. - Allow open access to all services (not recommended because anyone can upload documents)
This will all open access to search as well as maintain the data and other options. This is not recommended as it will expose all the data and may not be the secure option if you want to use it in your application where there is sensitive data. - Allow access to all services from specific IP(s)
This is the same as above, but we are restricting the search, suggestions, and domain request from some particular IPs only. This is a good option where you search domain used in some internal application, and it is not open for other users. Then you can whitelist those IPs and restrict others. - Deny access to all services (No one can access your endpoint)
Search and document requests must either be submitted through the console or authenticated with your account credentials. The document and search endpoints do not allow anonymous access or accept requests from other AWS users.
- Search and Suggester service: Allow all. Document Service: Account owner only.
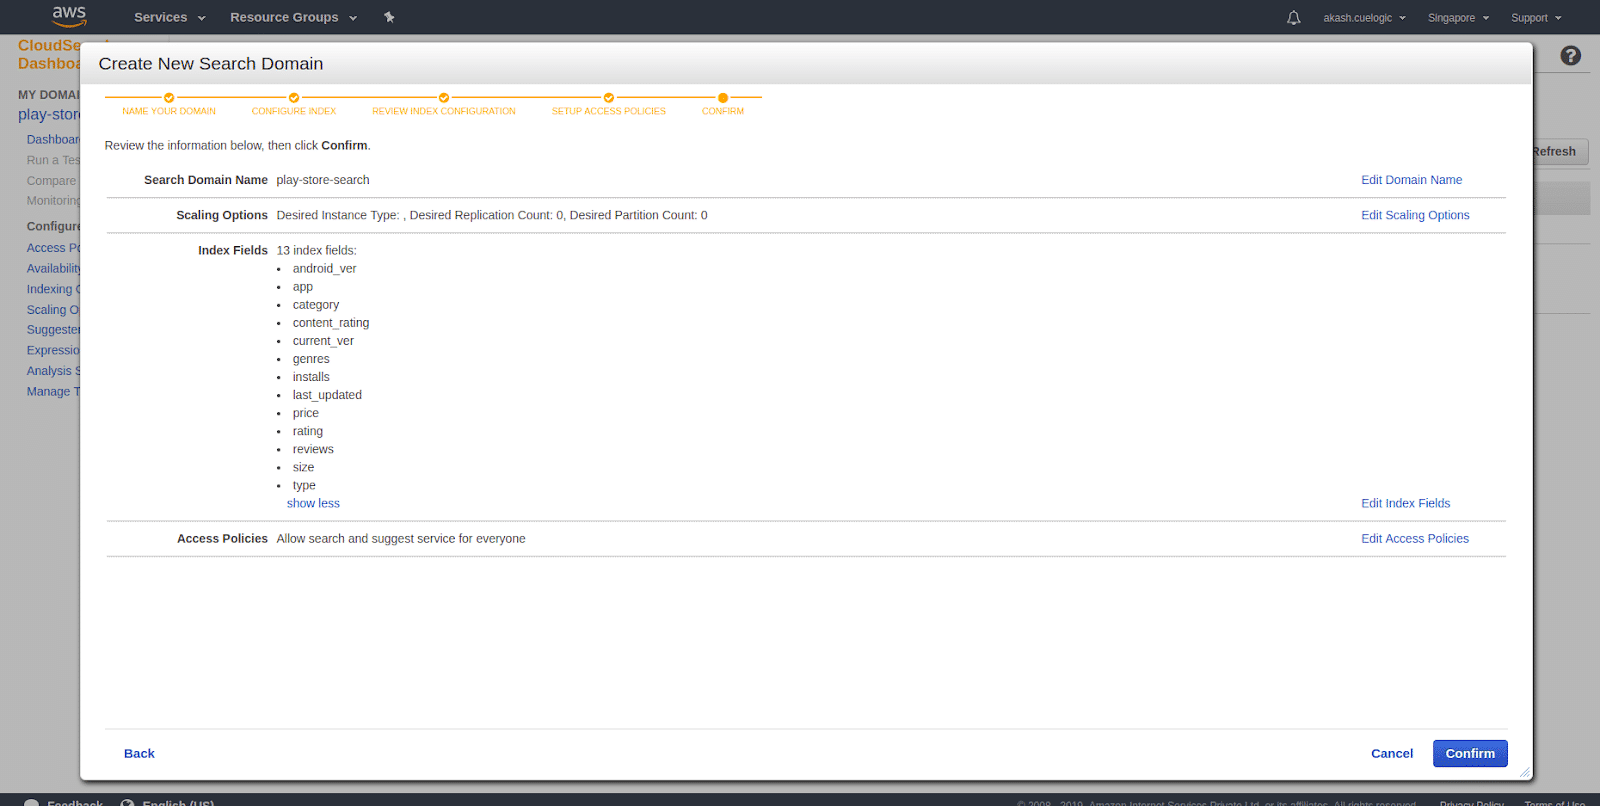
- Confirm Domain info The last step is to verify the domain information. It’ll list all the indexed fields, scaling options, and access policies. You can click on edit options next to it and make changes before confirming. If you are satisfied with your configuration, click Confirm. This will take you to the dashboard page where you will see the status of the domain with other information.
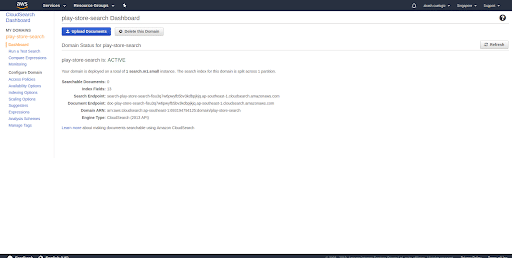
- Domain dashboard The dashboard will have the following information
Searchable documents: Count of number of records that are available to search from
Index Fields: Fields which are indexed and either searchable, returnable, or have sort options.
Search Endpoint: Endpoint of an API where you’ll be querying your data.
Document Endpoint : It’ll have all the information needed to set up the domain and how to use search services.
Domain ARN: Amazon Resource Names (ARNs) uniquely identify AWS resources. Every resource in AWS will have a unique identification number with specifying a resource unambiguously across all of AWS.
Engine Type: Type of search engine (CloudSearch) with the API version (2013). A search engine makes it possible to search extensive collections of mostly textual data items (called documents) to find the best matching results quickly.Note: Search Endpoint and Document Endpoint will be dynamically created from the name of your search domain given in the first step.
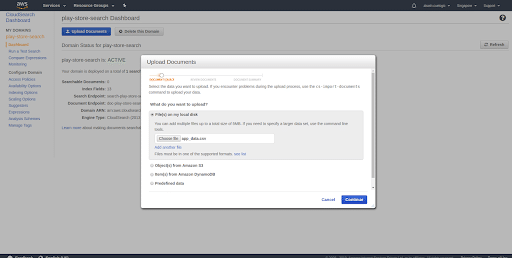
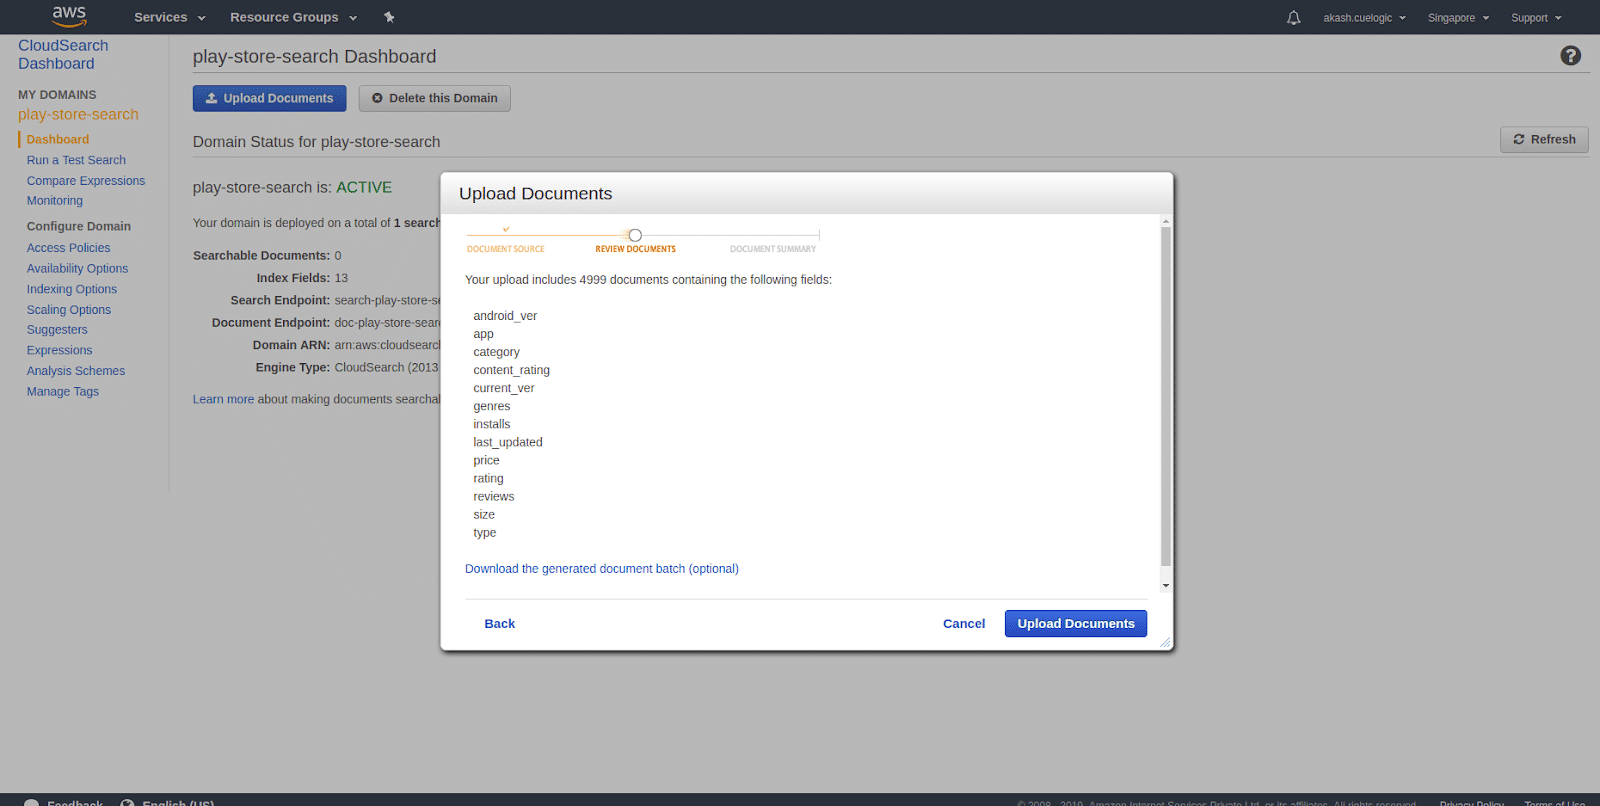
- Upload search documents As you can see above, the count of searchable papers is 0. In the initial steps, we just configured the indexes and added options to make them searchable sortable, etc. But if that is only a schema of search documents, we need the data sets with the same attributes and make them available for search requests. CloudSearch will allow you to upload your data in multiple ways. They are the same options that we choose in part 3, where we were uploading the document for adding indexes.
- Review the data Before all the records get uploaded to the service, it’ll first ask you to verify the data fields. Once you confirm that it’ll upload it to the service. Once you click on Upload Documents, it’ll start uploading all the records from the selected data source and index them and make them searchable.
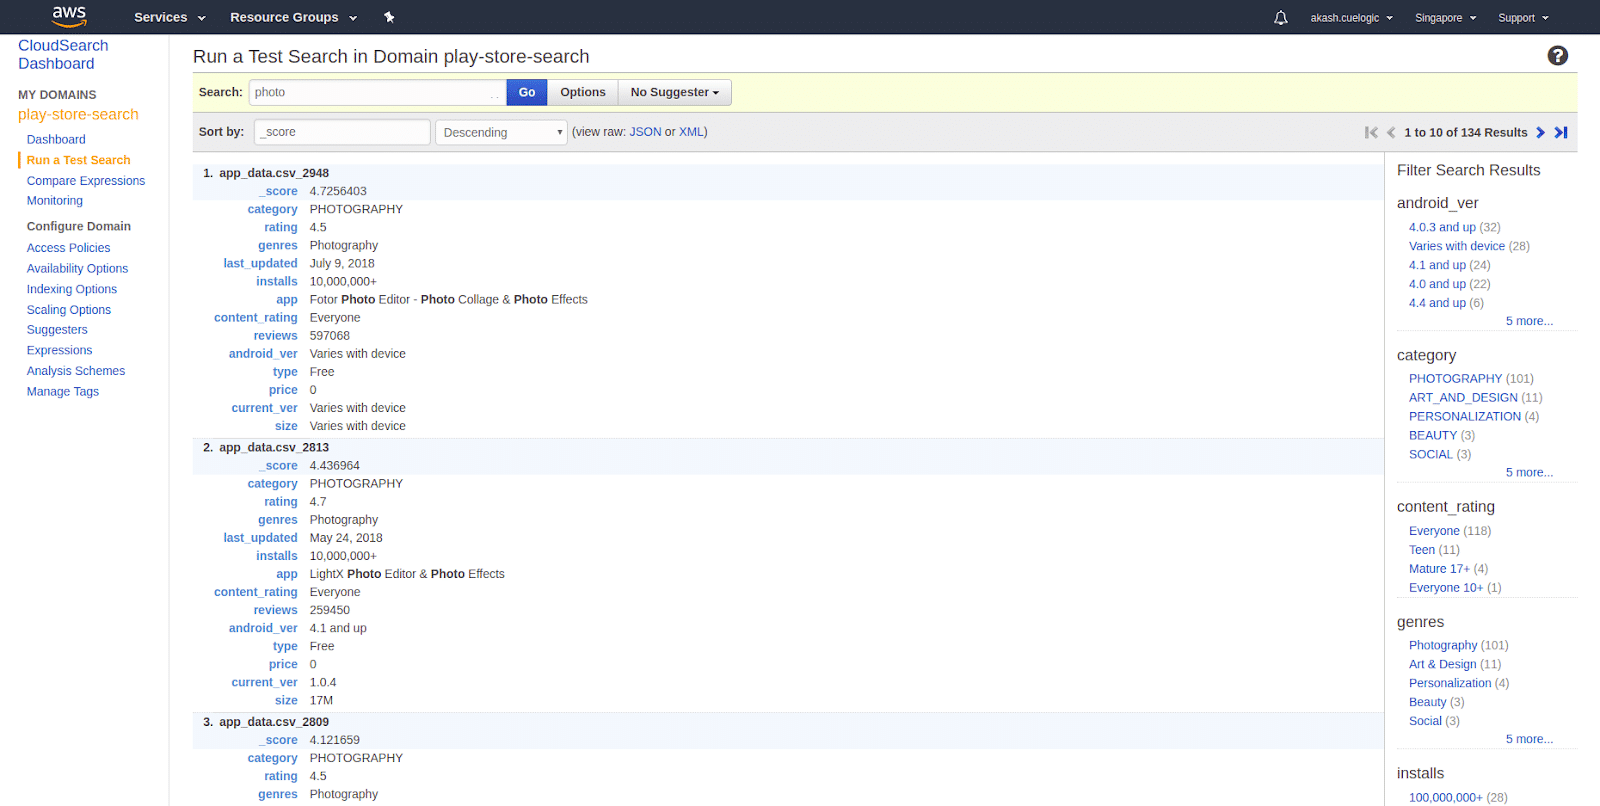
After all the data is uploaded, you can start testing out your data …….. - Testing your data Testing your data is quite easy in Amazon CloudSearch. You can put your query text in Test Search input field and click GO. This will search through all the searchable fields that you selected while indexing and give you results as shown below. You can also query via your Amazon CloudSearch Domain and simple q expression which will do a default search to all the searchable fields.
So these are the steps to set up your Cloud domain with your personal data set and start testing and tweaking with indexes and data configurations. There are multiple options available to do the advanced search options with nested and query suggestions that you can build depending on your search filters. We will try to cover in the next part. Amazon CloudSearch is a complete search solution which will allow you to scale and upload new data realine and make available to search in no time. With Amazon CloudSearch, one should be able to create their search domain, set search attributes, upload the data, and start testing them out in no time. It provides intuitive step by step wizard that will allow you to set that up easily.