
The A to Z Guide to Angular Lifecycle | Hooks & Components
Angular is a prevalent, broadly used client-side platform that has won millions of developer’s hearts in recent years. With the emergence of the Angular platform, application building has become extensively easy both for web and mobile. We can also use Angular in data visualization to leverage its incredible potential. There are new versions emerging each year and Angular lifecycle keeps on evolving.
The platform was introduced by Google back in 2009. AngularJS the first initiative by the Angular team was extensively popular and was dependent on HTML and JavaScript. However, in the later versions, you can find that JavaScript got replaced by Angular TypeScript and other modern scripting languages.
Angular has given the developers the freedom to develop applications that can run on web, mobiles, and desktop. With time Angular has undergone many modifications and has introduced many versions after AngularJS to Angular7 and still counting.
Angular vs. React: Which One is Superior?
What is Angular Lifecycle?
Each Angularjs component goes through 8 phases in its lifecycle. When it is initialized, it creates and presents its root components. It is designed and it produces its heirs. For the components that get loaded during application development, it keeps checking when the data binding properties are getting changed and updated. When the component is not used anymore, it approaches the death phase and is decimated and expelled from the DOM.
It is interesting to notice that Angular itself oversees all the lifecycle of angular Components and Directives, you have to understand the lifecycle with the result in mind to have the smooth progress of your application. The following information that I will share applies to both components and directives.
Components are the primary building block for any Angular version. So it becomes utmost important to understand them to understand the processing steps of the lifecycle of components, then only it can be implemented in the application development using Angular.
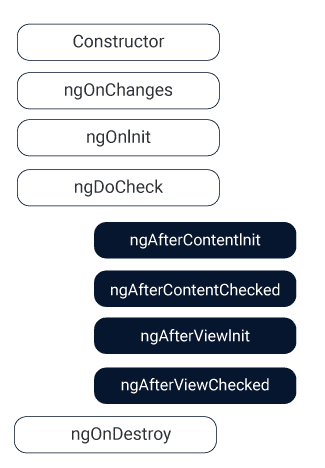
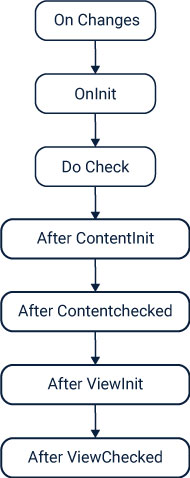
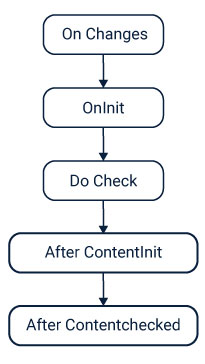
The most exciting thing that you will notice in Angular is each, and every component in it has a lifecycle, and every stage of a lifecycle goes from initialization to destruction. A component lifecycle goes typically through eight different stages.Tweet
When an Angular component gets initialized, it creates and presents its root components. Which then designed and produced its heirs. For all of the components that gets loaded during the development of the application, it keeps checking when the data binding properties are getting changed and updated. When the component is not utilized anymore, it approaches the death phase which is then decimated and is expelled from the DOM. Sometimes you may have to write some additional codes as these events take place. I have tried to present the most natural glimpse of lifecycle of component, now let us elaborate it.
Lifecycle hook overview
The events in the life of a component are also referred to as “lifecycle hooks.” You may get uncomfortable with the term lifecycle hooks, but it is nothing but simple functions that a developer can call during a specific point of the life of a component in their Angular application. We can also state that these lifecycle hooks are callback method that Angular raises when a positive event happens in the lifecycle of a component. There are 8 distinct kinds of hooks in the lifecycle of a component or directive.
You can execute hooks from the Angular core library as well to consolidate some unique components into the lifecycle of your application.
When to use angular lifecycle hooks? Developers can knock on to the significant moments of a lifecycle by actualizing one or more hook interfaces from the Angular core library. Hook events can be included at any stages of an application to get excellent control over the components.
For example: To introduce a component ngOnInit is summoned by Angular.
- For the changed input property of a component, ngOnChange is invoked by the Angular.
- On the destruction of a component, ngOnDestroy is invoked by the Angular.
The components are TypeScript Class; this is the primary motivation why you have to consider every component as constructor method. In the lifecycle hook event, the constructor of the component class gets first executed. For injecting dependency into the component, you must make use of the constructor. Angular executes the constructor first then only execution of all other lifecycle hook methods occurs explicitly.
Constructor versus OnInt
Being a developer, it will be essential for you to generate your component and introduce it. For that you must settle on two options that are either you can utilize constructor or use OnInit lifecycle method. With the initialization of component, the OnInit lifecycle method gets triggered.
Which method you like to use is your decision, but many people have opined that they prefer to use ngOnInit for declaration or initialization and try not to use the constructors.
Interfaces
The interface is a fundamental instrument to hook into the lifecycle method, as the component class of your application needs to implement the essential interface. As for the introduction of view, the method that should be triggered to implement the interface is “AfterViewInit,” and the method for this is ” ngAfterViewInit.”
ngOnchanges
This callback function is sought after when the data-bound property variations happen for a component or in simple words, we can say this event gets executed as and when the input control gets renewed inside the component. A changed data map is received by the Angular containing the present and previous position of the data-bound property encased in a simple change.
Using this lifecycle hook a Parent component can easily communicate with its child component if the property decorator exposes @InputDecorator of the child component. Even if the parent deviations the input property this hook gets summoned in the child component. Developers use this hook to discover the details about the input property that has been changed and how it got changed.
Properties:
- It can be utilized practically in all the components that have input.
- Gets invoked whenever the input value gets changed.
It gets the initial call to get raised before ngOnInit.
ngOnInit
When Angular has completed the creation and introduction of components this callback is invoked, it also gets initialized as Angular displays data-bound properties. This event gets its call only after ngOnChanges event and after the constructor. With this hook, you can initialize logic to your component. As it is already said, this hook gets initialization after ngOnChanges that means all the properties ngOnInit can use all its properties. Any of the child directive properties cannot be used before this hack gets triggered.
Properties:
- This hook initializes data for a component.
- After setting the input values, this hook gets its call.
- This hook is added by default by Angular CLI to all the components.
- It is called only for once.
ngDoCheck
This is most sought after hook whenever there is a vitality to review the input property of a component or directive. You can even use this call back for your logic check. In short, through this hook, you can do custom check for your logic that you want to implement in the component.
This hook comes on demand instantly after ngOnInit, and this hook has its duty of execution even if there is no change in the property of a component. This hook arises to rescue if Angular miscarries to detect any change in the input property.
Properties:
- Run by Angular to detect any changes.
- Called for change detection.
ngAfterContentInit
ngAfterContentInit becomes a demand next to ngDoCheck when every content of the components gets introduced and checked for the first time. This method is implemented as soon as Angular makes any content projection within a component view. This method is also called when the properties get clearly demarcated as ContentChild and ContentChildren and are fully initialized.
External child components can be included by Angular using this method within the <ng-content> </ng-content> tag. In the total lifecycle of a component, this hook gets call only for once.
Properties:
- After ngDoCheck it is called initially.
- It does its work by initializing the content.
ngAfterContentChecked
This hook method accomplishes its work by investigating the modification in the content of the component using Angular change detection apparatus, and it still performs its task even if there is not at all any modification. It gets its call after ngAftercontentInit and also gets executed after every execution od ngDoCheck. It plays a big role in the initialization of the child component.
Properties:
- This method waits for ngContentInit to finish its execution to get started.
- Executed after all ngDocheck.
ngAfterViewInit
This lifecycle method gets its call after ngAfterContentChecked and finds its use only on components. This is very much similar to ngAfterContentInit, and it gets invoked only after all the component view and its child view.
Properties:
- After the initialization of view, it gets its call only for once.
ngAfterViewChecked
This Angular lifecycle method gets triggered subsequently as it checks component’s view and child view. This method gets its call after ngAfterViewInit and then for every ngAfterContentChecked method. Like many other lifecycle hooks discussed above it is also applicable for components only.
When something is awaited from the child component, this component can be helpful.
Properties:
- After the checking and initialization are done, this gets its called.
- After every ngAfterContentChecked method finishes its job, this method starts its work.
ngOnDestroy
This lifecycle hook gets its call after Angular destroys all the components or directives. This is the place where you can use your clean up logic and unsubscribe from all observable and detach from event handlers, by doing so you can prevent memory leakage.
Properties:
- Gets its call just before components get removed from DOM.
How can you make use of Angular lifecycle hooks?
The things that you should follow are as under:
- First, you have to import the hook interface.
- In the hook interface, you ought to announce the component or directive.
- Next, you ought to generate the hook method.
The best strategy to import hook interfaces
Here the importing hook interface from the core module is essential. Adding prefix before the name is not required.
export class SpyDirective implements OnInit, OnDestroy { ….}; @angular/core’;
(The code is taken from https://angular.io/guide/lifecycle-hooks)
Statement of the component that actualizes lifecycle hooks :
In the subsequent stages, you need to characterize the App component that executes the OnInit interface. The code structure for that is given below.
//export class AppComponent { ,
(syntax taken from c-sharpcorner.com)
Generating the hook methods
One thing that you should remember is the “hook” and “hook method” must have the similar name.
Right at the point when the components are made the hooks are implemented in the associated way depicted under –
However, the arrangement of execution gets some expansion in it when components with the child are created.
Now for child component again we have to run-
Here again, joins the parent After ViewInit.
Want to discover the biggest tech trends disrupting the next decade?
Conclusion
In the above article, I have discussed the lifecycle hooks and their sequence in which they occur in the lifecycle of a component or a directive. One thing you should remember is these lifecycle hooks apply to both components and directives.
Being a developer you must know how much importance the component holds in Angular, so knowing about these lifecycle hooks is equally very important. After reading this article, you have gained the knowledge about the hooks and what role they play in the lifecycle of an AngularJS development. You should be cautious of using these hooks as all the hooks may not be needed for your project, so choose those which are necessary for you.
General FAQ
What is Angular Lifecycle?
Each Angularjs component goes through 8 phases in its lifecycle. When it is initialized, it creates and presents its root components. It is designed and it produces its heirs. For the components that get loaded during Angular application development, it keeps checking when the data binding properties are getting changed and updated. When the component is not used anymore, it approaches the death phase and is decimated and expelled from the DOM
What are angular lifecycle hooks?
The events in the life of a component are also referred to as lifecycle hooks. Lifecycle hooks are callback methods that Angular raises when a positive event happens in the lifecycle of a component. There are 8 distinct kinds of hooks in the lifecycle of a component or directive.
How to use angular lifecycle hooks?
The things that you should follow are as under:1. First, you have to import the hook interface.2. In the hook interface, you ought to announce the component or directive.3. Next, you ought to generate the hook method
When to use angular lifecycle hooks?
Hook events can be included at any stage of an application to get excellent control over the components. Developers can knock on to the significant moments of a lifecycle by actualizing one or more hook interfaces from the Angular core library.