
ReactJs Lifecycle | Initialization, Mounting, Updating & Unmounting

The ReactJS lifecycle is an extensive tool that can be used to design a memorable experience on the web. They’re one of the most robust avenues in the development word to allow us to create UI-oriented applications. These apps can be launched on the web for the greater audience to consume as well. While ReactJS is being updated regularly, the core functionality follows a lifecycle route. React JS Components rise and give birth to others in a loop format. This makes the entire process that much more efficient and leaner.
Ideally, the lifecycle of ReactJS is split into four core stages –
ReactJS Lifecycle – Initialization, Mounting, Updating & Unmounting
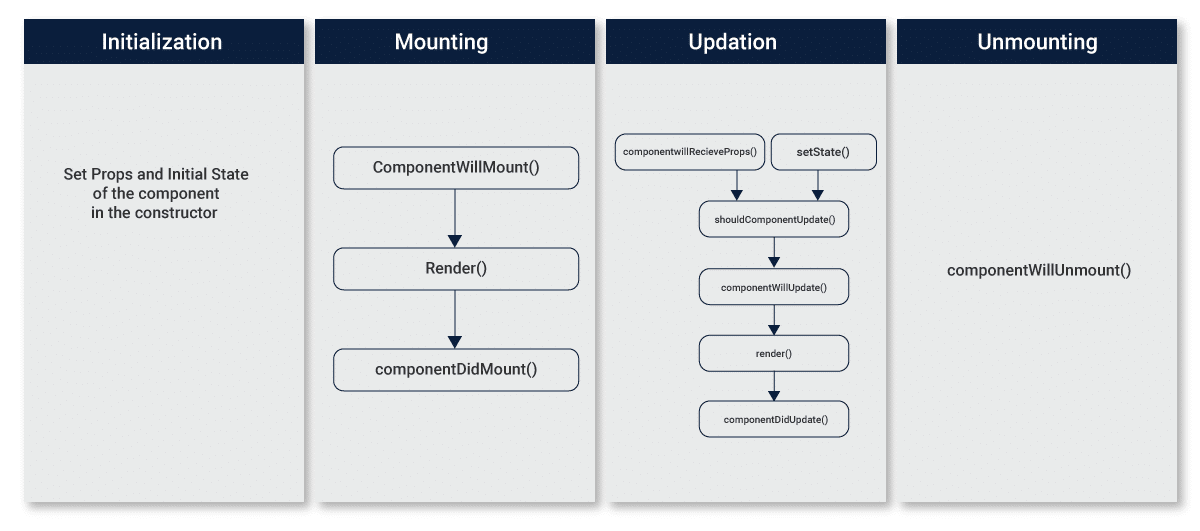
Each stage serves a unique purpose in the development cycle and has a wide range of operations to perform. The developer can code in specific commands to ensure exceptional results when the user engages with the application. This is where engineers can code the right ReactJS services.
Users can also experiment with the app and find that it works (as programmed) every time. This is because ReactJS developers adhere to the lifecycle protocol and create a uniquely functional app for them. Whether that be an online calculator or a reference guide for a library, the UI will react to the command accurately as it follows the lifecycle through.
What is ReactJS used for?
ReactJS is a JavaScript library that can be used to design engaging user interfaces. The core technology behind ReactJS allows users to interact with online experiences seamlessly. There is no updating of code or new features being integrated into via the cloud. The processing is done on the spot, and there is low latency to the final computation. This can be used to design a weather app, a simple logging system or even some of the more complex ticket booking apps that are seen online.
It’s crucial for ReactJS developers to become familiar with the technology as it can enhance their coding skills to create more memorable experiences. They can leverage ReactJS to create more unique online apps that allow the website/app to stand-out in the marketplace. Additionally, ReactJS is a popular language that all developers should have a basic idea.
“Both for tech and product, we look at people who have fundamental problem-solving skills. If we hire for front-end, we will ideally go for people with ReactJS experience. We also have a ‘Hire & Train’ model, but given that this is mostly a startup, we need out to balance it out with people with experience as well. Our team has a mix of both.” – Nitin Chandra, Head of Products, NestAway.
From a versatility stand-point, ReactJS wins again. It has multiple features and functionalities that can be leveraged over time. From a powerful results point of view, ReactJS is helpful here still. It can work with AI and Machine Learning systems to create more robust final solutions. ReactJS works best on its lifecycle of deployment when the coding environment is streamlined. That’s why many ReactJS projects require coders to work within the parameters of the lifecycle mentioned.
Advantages of ReactJS
Since Facebook develops ReactJS, it has some exciting features that set it apart from traditional coping mechanisms. Some might even compare it to Angular, but the advantages are more apparent to see as we review the technical side.
- Web and Mobile apps
ReactJS is designed to take care of the rising demand for more powerful apps. Web and mobile apps are going so much more because of the proliferation of ReactJS. Coders can invest time in learning the basics behind ReactJS and start working on complex apps from the get-go. Since the library is created for ReactJS developers to code more efficiently, it’s a top language to pick up when working in dynamic environments.
“Our free, open source product is called P21 Community. It’s a Java/ReactJS application that has been used across the majority of the pharmaceutical industry to validate data before submission to the FDA. Big pharma companies have historically used the community, but currently, its primary audience is smaller companies, biotechs and individuals who need to run it once for validation.” – Brad Moran, Founder, Pinnacle 21 data tech.
Virtual DOM allows a superior connection between browsers and web apps. This will enable engineers to tackle multiple challenges in integration and connectivity.
- Adaptable framework
One of the most significant advantages of using ReactJS is the fact that it is flexible as a framework. It’s a versatile library that permits descending information authoritative. The report ensures that newer components are not affected by the parent information available. This makes it so that ReactJS developers can code in unique features over more extended periods. Adaptability blends into the overall architecture, while providing more significant benefits.
- Updating content dynamically
The network built in ReactJS is incredibly dynamic, making it so that all content is displayed as updated. The framework is lighter and can be extended to take care of portability. Code mods can also help in the movement of arrangements from an established render. Since the content is updated dynamically, there is a more concurrent nature that is explored within the Javascript framework. This allows developers to store vital information within the ReactJS framework and reproduce it in another context.
Challenge with ReactJS
The only challenge that is significant enough deals with the UI and MVC framework. Sometimes updates take longer than expected, and there is limited documentation available. That’s where the ReactJS community comes in and provides greater insight into the domain. It can also create a more robust library wherein coders can add or subtract from. They can leverage the technology to fit their own unique needs from the coding schema.
ReactJS is more robust and better to use than any other alternative in the marketplace. Going from Angular to ReactJS is also a cleaner move as there is more flexibility in using the ReactJS library. By being based on the JavaScript and JSX (a PHP extension), the result is a highly reusable element cluster for web experiences. It’s rising in popularity for this reason, and more companies are employing ReactJS coders than before. It’s becoming a clear winner in the race to the top for the most flexible language for building front-end experiences.
Everyone from Instagram to Uber is using ReactJS to create better user experiences. Technology is being used across multiple applications that are driving user growth. Owing to the scale and flexibility that ReactJS offers, it’s essential to study its lifecycle as well.
The stages of ReactJS Lifecycle
While ReactJS can be used across IoT, AI, and web applications, engineers need to follow a specific pathway to build out their forms. This is best accomplished utilizing the ReactJS lifecycle, going from initialization to unmounting. This makes ReactJS an increasingly scalable application that relies on better processing and more impactful coding architecture. The properties one state gets affected by the defined relationship.
Initialisation
This is the first stage in the ReactJS lifecycle and is essential to understand and explore thoroughly. This is the stage where the component is constructed with the provided properties and a default state. It’s done in the constructor of a component class. The developer has to define the ideal props (properties) and the initial state of the component. A reference example is shared below.
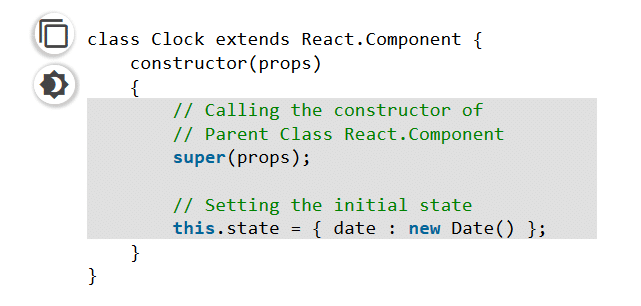 Image source: https://www.geeksforgeeks.org/reactjs-lifecycle-components/[/caption]
It’s important to understand how the components are initialised when you populate their state or properties. This can help them render the right information, outside of their skeleton markup. You can also do so early on in the ideation phase to streamline your coding approach.
There are mainly three pieces of data that the JSX depends upon, which are listed below –
“error” – This is the standard message that is displayed when there is a bug in the system, or a rendering has a mistake in it.
“loading” – Loading is when the application is fetching the API data.
“users” – The data that is retrieved from the API is critical as well.
This helps in initiating a successful coding architecture within the greater user interface module. While the component is setting up the initial state in the constructor, you can change it later using the setState method. This gives you more flexibility in coding as you move on towards the other end of the lifecycle. The defaultProps is also defined as the property of the component so that you can identify the default value of the props. You can override this later as well with new prop values.
You can then lay out default values that the app can leverage as a default state. This default state is the one that can be used multiple times over several applications. It’s important to code this part out correctly as it sets the stage for the next layers in the lifecycle.
Mounting
This is the next stage in the lifecycle and a critical one for launch. After you have prepared the code with basic requirements, states and props, you need your component to mount in the browser. This is done via browser DOM, and the phase gives you the right ReactJS hooks methods for a before and after fitting. Here are the critical terms that you should be adept in.
“render” – Render is what mounts the component onto the browser in this state. It is a classic method that gives the same output every time the same input is provided. It’s a standard function that is used extensively in the ReactJS coding framework.
“componentWillMount” – This is a critical function to remember as it is executed just before the reach component is about the mount. The mounting on the DOM is done after this stage, wherein you can enter all the things that you want to the program to do. It is also executed once in a lifecycle of a component and occurs before you render the program for the first time. It is also used for initialising the states or props as well, making it a robust component to leverage.
“componentDidMount” – This is the final ReactJS hook method that is executed after the component mounts the DOM. It’s also performed once in the lifecycle and occurs after the first rendering. Engineers can access the DOM via this method and initialise the appropriate JS libraries. You can access the DOM efficiently using this component. You can also initialise using several other libraries that can be incorporated into the final output. You can also make the right API calls under this method so that you can retrieve the data the right way.
Updating
The third stage starts when the component has been adopted on the browser. This can then grow by receiving new updates from the program. The user can interact with the program, and then the component can be updated accordingly.
Developers can typically update the component in a few main ways. They can either send new props to the command or update the state entirely. Depending on the complexity or the scale of work, they can choose either method and get the program running.
Here are the following hook methods that are critical to understanding.
“shouldComponentUpdate” – The method tells the program about the state of rendering when it is updated. If new props or rules are being updated, then a rendering can be done or skipped. This is important to code in properly as there are evolving states in the program as well. Updating the method as true/false is the proper approach. The default here is true, which can be changed as per the code.
“component will update” – This is executed when the prior method returns the answer of true. It’s then used to prepare the upcoming render, in the case where some previous calculation is necessary before returning a response. For more complex programs, this method can be used as well.
“componentDidUpdate” – This is then executed when the updated component has been updated in the DOM as well. You can then initiate new libraries to reload as well so that you can maintain an updated program throughout the process.
Rendering can be triggered accordingly, as per the core requirement.
Unmounting
The final stage of unmounting is essential as it doesn’t require the component and gets unmounted from the DOM. As the final state, it is designed to produce the outcome via unmounting.
Here is the essential method used in unmounting –
“componentWillUnmount” – This is the last method in the lifecycle as it pertains to the core unmounting and removal from the DOM. The cleaning up of the component is also performed here. This is also used in the logging out of users when they want to clear out the program from their browser.
Conclusion
As we go from Initialization to Unmounting, the lifecycle provides developers with a robust module. Components can follow a charted path, which can then be scaled up as needed. This is a more organised format of coding complex user interfaces. At every junction, the right amount of information and processing is necessary.
Users can interact with the application and receive the right amount of feedback and information in return. This makes interactivity more engaging and results emerging faster. Developers can also plan out the use in a more systematic fashion, by following along the ReactJS lifecycle.
This will help developers to create an app that is more functional, takes less resource and turns up to be very user friendly. Knowledge of lifecycle components are just tools for developers that help them craft phenomenal web-apps based on React!